Bees & Bombs
Rebuilding a gif from Bees & Bombs
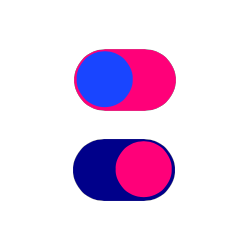
Tutorials>Customizing A Switch
Author
Oliver Andrews (with a little ❤ from Travis)
Estimated Time
10 - 20 minutes
Tutorials>Customizing A Switch
Customizing A Switch
Travis recently hacked UISwitch to make customizing standard UIKit switches easy and straightforward. I had this really cool switch example in mind that I found on this pintrest board, and then jammed with Jake from @jakesmakes on the design and layout of our own version of that switch.
The Switch consists of two components: The switch background and the switch button. In this tutorial, I’ll show you how to add the Switch to your WorkSpace, customize the components, and then make sure everything looks good.
If you haven’t already done so, install C4 by following the instructions on our install tutorial. The easiest is to use the first option.
Not Your Old Switcheroo
In the following steps you’ll lay the groundwork for creating a custom version of a UISwitch. To make things a bit smoother you’ll have to incorporate some already made files. First…
Create a new C4 Project
Add Switch files to project
You’ll be using 3 classes that were discussed in a previous tutorial.
Grab a copy of the 3 files found HERE.
The files you’ve just grabbed consist of a Switch, SwitchThumb and SwitchBackground.
Drag them into the file inspector of your project.
In the WorkSpace file add this line of code in setup():
1
2
var switch = Switch(thumb: SwitchThumb(), background: SwitchBackground())
canvas.add(switch)
When you run it, you should see the switch with its default colors.

Add Some Assets
You’re going to need some assets that we’ve already prepared.
After unzipping the file grab all of the assets and drag them into the Images.xcassets folder in your project, like so:
Customizing The Switch
To create your own custom version switch your going to create a subclass of Switch which is already a subclass UISwitch. The Switch class has two major components:
- A Background
- A Thumb
To create the moon version, you’ll be subclassing these three objects:
- Switch
- SwitchBackground
- SwitchThumb
Let’s start with the background.
Create MoonBackground
The SwitchBackground is a subclass of View that allows us to customize the pill behind the thumbnail button.
Create a new file and name it MoonBackground then add the following code to it:
1
2
3
4
5
6
7
8
9
class MoonBackground: SwitchBackground {

    var sunColor = Color(red: 164, green: 245, blue: 253, alpha: 1.0)
    var moonColor = Color(red: 19, green: 44, blue: 72, alpha: 1.0)

    override func setup() {
        self.backgroundColor = sunColor
    }
}
Here you’re making a new class, a subclass of SwitchBackground and then adding two colors as variables. You’ll create a way to switch the colors soon, but for now, just set the backgroundColor to sunColor in setup(), like this:
1
2
3
override func setup() {
    self.backgroundColor = sunColor
}
On() and Off()
You want the backgroundColor to change when the switch is pressed, so you’ll need to override the on() and off() functions.
1
2
3
4
5
6
7
override func on() {
    self.backgroundColor = moonColor
}

override func off() {
    self.backgroundColor = sunColor
}
Place Small Stars
All that’s left for this class is to create some functions to place all the stars. Below your two other class variables add this:
1
var stars = [Image]()
Then add the following function, which will place all of the small stars and add them to your star’s array.
1
2
3
4
5
6
7
8
9
func placeSmallStars() {
    let centers = [Point(21.0,5.75), Point(6.5,10.25), Point(20.5,20.75), Point(17.0,26.5), Point(18.0,13.0), Point(17.0,7.75)]
    for point in centers {
        let smallStar = Image("StarSmall")!
        smallStar.center = point
        stars.append(smallStar)
        self.add(smallStar)
    }
}
Place Large Stars
Just like the small stars, you’ll need a function to add all of the large stars.
1
2
3
4
5
6
7
8
9
func placeLargeStars() {
    let centers = [Point(9.5, 18.5), Point(12.0, 13.0), Point(17.0, 27.25)]
    for point in centers {
        let largeStar = Image("StarLarge")!
        largeStar.center = point
        stars.append(largeStar)
        self.add(largeStar)
    }
}
Remember to call both of these methods from
setup()
Create MoonThumb
Customizing the thumbnail is a lot like the last section.
Create a new file called MoonThumb.swift and add the following code:
1
2
3
4
5
6
7
8
9
10
11
12
13
14
15
16
17
18
import UIKit
class MoonThumb: SwitchThumb {
var moonTexture = Image("MoonTexture")
var outerGlow = Image("OuterGlow")
var sunColor = Color(red: 255, green: 238, blue: 90, alpha: 1.0)
var moonColor = Color(red: 251, green: 246, blue: 217, alpha: 1.0)
override func setup() {
lineWidth = 0
fillColor = sunColor
self.add(moonTexture)
outerGlow?.constrainsProportions = true
outerGlow?.center = self.bounds.center
self.add(outerGlow)
}
}
This snippet sets up the basic elements for the MoonThumb class. It does the following:
- creates a moon texture
- creates an outer glow texture
- creates the colors for moon and sun
- styles the thumbnail to appear as the sun
- adds and positions the textures
Since the assets for the thumbnail are already the proper size, we don’t neet to change their widths or frames.
On() and Off()
Override the on() and off() super class functions so they look like this:
1
2
3
4
5
6
7
8
9
10
11
12
13
override func on() {
    fillColor = moonColor
    moonTexture?.opacity = 0.66
    moonTexture?.transform.rotate(-M_PI_4)
    outerGlow?.opacity = 1.0
}

override func off() {
    fillColor = sunColor
    moonTexture?.opacity = 0.0
    moonTexture?.transform.rotate(M_PI_4)
    outerGlow?.opacity = 0.0
}
When triggering the switch, we want to see the moon “roll” into position. This is why we toggle its rotation between
-M_PI_4andM_PI_4.
Create MoonSwitch
In order to get your switch to use your newly made components you’ll need to subclass Switch.
Create a new file and call it MoonSwitch.swift and add the following code:
1
2
3
4
5
6
7
8
9
10
class MoonSwitch: Switch {

    override func awakeFromNib() {
        self.thumb = MoonThumb()
        self.background = MoonBackground()
        replaceViews()
        setup()
        toggle()
    }
}
WorkSpace detour
At this point, you should be able to see you new switch when your app runs if you go back to your project’s WorkSpace and change it to this:
1
2
3
4
5
6
7
8
9
10
11
12
13
14
15
16
17
18
19
20
21
import UIKit

class WorkSpace: CanvasController {
    var dayColor = Color(red: 122, green: 232, blue: 252, alpha: 1.0)
    var nightColor = Color(red: 12, green: 30, blue: 50, alpha: 1.0)
    var myswitch: MoonSwitch!

    override func setup() {
        myswitch = MoonSwitch(thumb: MoonThumb(), background: MoonBackground())
        canvas.add(myswitch)
        myswitch.center = canvas.view.center
        myswitch.addTarget(self, action: "toggle", forControlEvents: UIControlEvents.ValueChanged)
        toggle()
    }

    func toggle() {
        ViewAnimation(duration: 0.25) {
            self.canvas.backgroundColor = self.myswitch.on == true ? self.nightColor : self.dayColor
            }.animate()
    }
}
A couple things you should notice here:
- The
myswitch.addTarget(...)is the line of code that syncs up theUISwitchaction with the toggle method. Attaching this action here doesn’t preclude you from attaching more actions in Interface Builder. - The
self.myswitch.on == true ? self.nightColor : self.dayColoris a simple technique for using a ternary conditional?to switch between different colors.
Back in MoonSwitch
At this point, the only thing missing from your switch is the clouds. Let’s get them in there! Add the following class variables:
1
2
3
var clouds = [Image]()
let cloudOpacities = [[0.83,0.15],[0.58,0.28],[0.52,0.07]]
let cloudTargets = [[Point(17.0, 28.5),Point(27.0, 28.5)],[Point(15.775, 4.0),Point(21.0, 9.0)],[Point(43.5, 20.5),Point(5.0, 20.5)]]
Now override the superclass function setup() and in this function initialize a view to add your clouds to and a shape to use as a mask. With a for loop you can create the clouds and add them to the view you just made.
1
2
3
4
5
6
7
8
9
10
11
12
13
14
15
16
17
18
19
20
21
22
23
override func setup() {
    let cloudsView = View(frame: Rect(self.bounds))
    cloudsView.interactionEnabled = false

    let mask = Rectangle(frame: Rect(self.bounds))
    mask.lineWidth = 0
    mask.corner = Size(mask.height/2,mask.height/2)
    cloudsView.mask = mask

    for i in 0...2 {
        let image = Image("Cloud\(i)")!
        image.center = cloudTargets[i][Int(on)]
        image.opacity = cloudOpacities[i][Int(on)]
        clouds.append(image)
        cloudsView.add(image)
    }

    clouds[1].transform.scale(0.5,0.5)
    self.add(cloudsView)

    thumb?.toggle(on)
    background?.toggle(on)
}
We want the clouds to be masked, but have the glow of the moon bleed over the edge of the switch. To get both effects it’s best to contain the clouds to their own view. This is why we add them to a view and then mask that view.
Override toggle()
In setup() set your thumb and background toggle to on; and while you’re at it, override toggle on this class.
1
2
3
4
5
6
7
8
9
10
11
12
13
14
override func toggle() {
    super.toggle()
    let a = ViewAnimation(duration: 0.25) {
        for i in 0..<self.clouds.count {
            self.clouds[i].opacity = self.cloudOpacities[i][Int(self.on)]
            self.clouds[i].center = self.cloudTargets[i][Int(self.on)]
        }

        let scale = self.on == true ? 2.0 : 0.5
        self.clouds[1].transform.scale(scale,scale)
    }
    a.curve = .EaseOut
    a.animate()
}
Now, whenever your switch is pressed you should see your clouds move and change opacities.
The
cloudOpacitiesandcloudTargetsarrays each have three elements(for each cloud) and each element is an array of two elements(for each state). The toggle state boolean is converted to an integer,Int(self.on), so that it can be is used to ensure the correct state is accessed.
##That’s It.
You’ve just added your own personalized touch to an actual UISwitch object. Though it looks different, it acts just the same as its native counterpart. The best part is that you can drop this object right into any other iOS app, and even work with it from Interface Builder.
###Code You can grab a copy of the code for this project from HERE
Switching Off
That’s it! Try switching out the images and colors we used in this tutorial to create your own custom UISwitch. Just subclass the components of Switch, add your own style and initialize.
Code
To see the final version of this example